How to Choose the Best Neutral Density Filter for Your Needs?
Choosing the right Neutral Density Filter can greatly enhance your photography. John Smith, a renowned expert in optical filters, states, "Selecting the right ND filter is crucial for achieving the perfect exposure." His experience speaks volumes in an industry filled with diverse options.
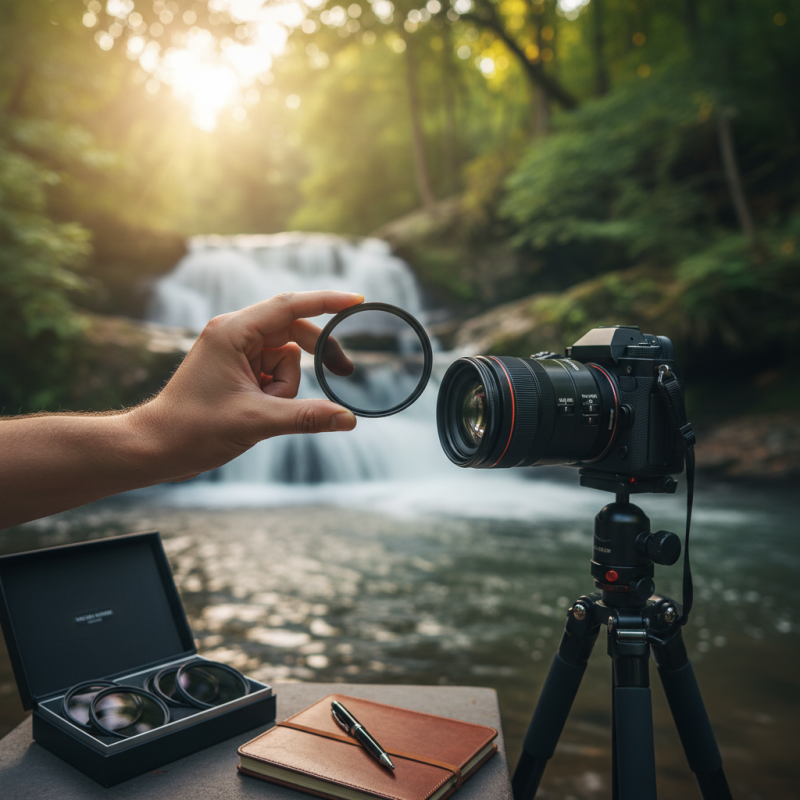
Neutral Density Filters reduce light without affecting color. They allow photographers to use wider apertures or slower shutter speeds in bright conditions. This creates stunning, blurred backgrounds or smooth water effects. However, not all filters are created equal.
Understanding the various types and strengths is essential. Some filters might introduce color casts, while others may have limited durability. It's crucial to carefully assess your needs before making a choice. Know what you prioritize in your photography. Good investment often requires reflection on your previous experiences.
Understanding Neutral Density Filters: Definition and Purpose
Neutral density (ND) filters play a crucial role in photography. They reduce the intensity of light without affecting color. This allows for greater control over exposure settings. Photographers use ND filters to achieve specific effects, such as longer exposure times or wider apertures in bright conditions.
When selecting an ND filter, consider its density. Filters come in various strengths, commonly measured in stops. A higher stop value means more light is blocked. For instance, a 3-stop filter reduces light by 8 times. This enables serene, flowing water effects that convey motion.
Tips: Assess your photography style. If you often shoot landscapes, a 6-stop filter may be ideal. For portraits in bright light, a 3-stop or 4-stop filter works well. Testing different strengths can help find your preference. Remember, experiment with various scenarios to gain insights into your ideal settings. Every photographer's needs are distinct, so personal experience is invaluable.
Types of Neutral Density Filters: Fixed vs. Variable Options
When selecting a neutral density (ND) filter, understanding the types available is crucial. Fixed neutral density filters offer specific light reduction levels, such as 3 stops or 6 stops. These filters are straightforward to use. Simply attach them and start shooting. They are ideal for specific scenarios, like long exposures in bright sunlight. However, they lack flexibility. If your shooting conditions change, you may need multiple filters.
Variable neutral density filters provide flexibility by allowing you to adjust the density with a simple twist. This feature is particularly useful when shooting in varied lighting conditions. However, they can introduce unwanted color shifts or reduce image sharpness at certain settings. It's essential to test these filters before a crucial shoot. Experimenting with both types helps photographers understand their strengths and weaknesses. Finding the right fit for your style can be a journey of trial and error. Take your time to explore which option suits your needs best.
Neutral Density Filter Types Comparison
This chart compares the popularity of Fixed and Variable Neutral Density Filters based on user preference. Fixed ND Filters are more popular among photographers due to their simplicity and reliability, capturing 70% of the measured interest, while Variable ND Filters, offering flexibility, account for 30%.
How to Determine the Right ND Filter Strength for Your Photography
When choosing the right neutral density (ND) filter strength, it’s essential to understand how light reduction impacts exposure. ND filters come in various strengths, measured in f-stops. A 3-stop ND filter reduces light by 8 times, while a 10-stop filter decreases light by a whopping 1,024 times. This variation can significantly alter how images are captured, especially in bright conditions.
To determine the appropriate ND filter strength, consider your shooting environment. If shooting landscapes in bright sunshine, a 6 or 10-stop ND filter allows for slower shutter speeds. This is crucial for capturing motion, such as flowing water or moving clouds. Reports indicate that photographers often prefer a 6-stop ND filter for its versatility, balancing light reduction with image quality.
Tip: Experiment with different ND strengths to discover what works best for your style. Start with a 3-stop filter and gauge results in various lighting conditions. Additionally, keep in mind that stronger filters may introduce color casts. It’s a crucial factor to monitor. Always evaluate the image post-processing to ensure color accuracy.
Understanding ND filter strengths deepens your photographic expertise. Each lens and lighting situation may require different considerations. This trial-and-error approach fosters better outcomes in your photography journey. Engage with other photographers and share insights for improved results.
Key Features to Consider When Selecting an ND Filter
When selecting a neutral density (ND) filter, several key features deserve attention. The filter's density is crucial, defined in stops of light reduction. Common ratings include 3-stop, 6-stop, or even 10-stop filters. Research shows that a 10-stop filter allows photographers to achieve long exposures even in brightly lit environments, ideal for capturing smooth water or soft clouds. However, the density also affects color accuracy and image quality, which can be a concern with lower-quality filters.
Material type is another vital consideration. ND filters come in glass and resin variants, each presenting unique advantages. Glass filters generally offer superior optical clarity, which minimizes distortion. A report by the Journal of Imaging Science states that glass filters exhibit 90% or more light transmission when correctly coated. Yet, resin filters can be lighter and more affordable, albeit at the potential expense of optical performance.
Additionally, filter size and mounting type matter significantly. They should fit your lens securely to avoid inadvertent light leaks. While standard 67mm or 77mm sizes exist, custom-mounted filters can safeguard against vignetting in wide-angle shots. Users should carefully evaluate their needs, as the wrong choice can lead to disappointing results, such as loss of detail or unwanted flares. The ND filter decision process requires thoughtful analysis and sometimes, trial and error to refine your kit.
How to Choose the Best Neutral Density Filter for Your Needs? - Key Features to Consider When Selecting an ND Filter
| Feature | Description | Considerations |
| Density Rating | Indicates the level of light reduction (e.g., ND2, ND4, ND8, etc.) | Choose based on desired exposure length or effect |
| Filter Type | Options include solid ND filters and graduated ND filters | Decide based on the scene and light conditions |
| Material | Common materials are glass and resin | Glass generally offers better optical quality |
| Coating | Anti-reflective and protective coatings reduce flare and scratches | Look for filters with multi-coatings for best performance |
| Size | Diameter must match the lens size | Use step-up rings if needed for different lens sizes |
| Price | Range varies widely; higher price often indicates better materials | Consider budget but balance cost with quality |
Maintaining and Caring for Your Neutral Density Filter
Proper maintenance of your neutral density filter is essential for optimal performance. Start by cleaning it regularly. Use a microfiber cloth for dust and smudges. If you encounter stubborn marks, use a lens cleaning solution. Avoid abrasive materials. They can scratch the filter’s surface. Always clean in a circular motion, applying gentle pressure.
Storing the filter is equally important. Keep it in a protective case when not in use. This protects it from scratches and impacts. Be mindful of the temperature and humidity in your storage environment. Extreme conditions can degrade the filter's quality over time.
Watch for signs of wear. If the filter starts showing discoloration or scratches, it may be time to replace it. Reflect on your storage habits as well. Are they sufficient? Taking a moment to evaluate can save you from future disappointments. Treat your filter as an investment, and it will serve you well.